Short Game Drills For Golf
Golfing World According to Gareth Greensill:
Everyone knows the importance of the golf’s short game. It accounts for up to 70% of the shots we take over the course of a round. Yet, despite the above, most weekend warriors, myself included, allocate little, if any of our practice time improving this area of our game. How often have we left the course only to think what might have been had we holed those one or two extra putts, or managed to get up and down from that tricky lie. This article has been written based on personal “demons” I’m still struggling to overcome to turn myself into a more consistent golfer, and may apply to other tour members who like me, sometimes battle to cash in after a good drive or approach into the green!
For the purposes of the article, I have split the short game up into four separate sections, namely
- Putting
- Bunkers
- Chipping
- Wedge Play
I will speak about the first two points in this article with chipping and wedge play to be covered later.
Selecting the correct tools for the job!
Before we look at common flaws and possible remedies to our putting and bunker shots, I believe it is important to understand the clubs we have in our bag and how they work. By this I mean looking at our putter selection and the bounce angle on the club we use for most of our bunker shots. Selecting a wedge with the correct bounce would not only allow us to hit better, more consistent bunker shots with little to no extra effort , but would also play a vital role in our approaches to the green. Likewise selecting the correct putter may lead to us holing a few more putts and more importantly eliminating those dreaded three putts which have become all too common on the SOS tour.
Next time you are looking to buy a putter, consider the following things which will help in making the correct purchase.
- Decide on a putter balance that best fits your natural putting stroke. This is probably the most important aspect when selecting a putter. Putters can either be toe weighted or face balanced and have been designed to accommodate different putting strokes and swing paths. If you have a more conventional stroke, known as an in to in or barn door stroke a toe balanced putter is for you. This will assist you in squaring up the club face on impact and eliminating those pulls or pushes. If one the other hand you are trying to achieve a more straight back and straight through stroke a face balanced putter would be your best bet. Next time you are on the practice green take a few minutes to analyse your stoke and compare it with the balance of your putter. You might be surprised to find yourself playing with the wrong type of club.
- Find the right length of putter. Although there is a standard length for conventional putters, approximately 35 inches, don’t be afraid to try different lengths. The generally accepted theory is the more upright you stand when addressing your putts, the better visual perspective you get which should in turn allow you to judge length and break better.
- Find the right putter weight. This choice may also be impacted by the speed of the greens you usually play on. Lighter putters generally perform well on faster greens and vice versa. It may also be a personal choice based on current tendencies such as always leaving your putts short. In this scenario a slightly heavier putter might do the trick, allowing you to get the ball to the hole without changing your swing length or speed.
- Whichever putter you decide is best suited to you, make sure you try out thoroughly before you buy it.
Bounce:
What is bounce? Some might be tempted to close this article right now with mention of technical jargon, but understanding this concept will significantly affect the decision on your next wedge purchase and in turn lead to better scores which should push Marcel even further down the current leaderboard! In layman’s terms, bounce is the angle that is formed between the ground and a line that is drawn from the point on the sole of the club that touches the ground and the club’s leading edge. It is measured in degrees and therefore will be a relatively low number. The picture below should give you the right visual:
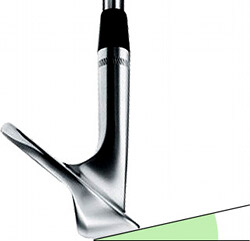
The bounce on a club is what allows you to control how likely the leading edge of the club is to dig into the turf/sand when you hit your shot. Most of you are probably asking how this would apply to a social golfer like you and I and what significant difference a few degrees of bounce could make in shooting lower scores. The answer is more than you think. Let’s look at a practical example.
We all play most of our golf on Highveld courses which tend to be fairly firm under foot, especially in winter when we receive very little if any rainfall. A harder surface logically makes it harder to dig a club into the ground when executing a shot. Everyone knows that the correct way to strike a golf ball is with a descending blow. We all watch the tour pros and see them taking divots, sometimes large ones with most of their iron shots, especially with their wedges. They do this to ensure a solid contact (hitting down on the ball) and to impart a significant amount of spin to control distance and flight. By choosing a club with a high bounce angle for Highveld conditions, especially in winter we are significantly decreasing our chances of hitting a good solid shot on a regular basis as the club is essentially counter acting what we are trying to achieve in the first place. As the club comes into contact with the ground, its design is such that the sole will bounce of the surface. This creates a situation where we would probably end up teething the shot. The opposite would apply to bunker shots where we want the club to bounce off and not dig into the sand. It’s a tradeoff that we have to weigh up and make a decision on based on how often we expect to use that particular club in a specific scenario during a round. It may also impact our decision to put another wedge into the bag to cover all scenarios
Bunkers
The bunker shot is one of the hardest shots in golf to execute correctly and consistently. We all watch tour players hitting fantastic bunker shots week in and week out and wonder why we can’t even remotely replicate their consistency and accuracy when faced with the same challenge. The truth is, a bunker shot for your average Joe is probably harder to execute than what the pros face. The reason I say this is the consistency of the sand in the bunkers themselves. On the professional tours, bunkers are maintained to the highest standards and tour pros can expect pretty much the same week in and week out. We are however faced with bunkers that vary in consistency from course to course and sometime hole to hole. It is thus even more essential that we develop a sound technique and approach to our bunker play.
Being successful out of the sand depends on three things: correct setup, proper technique and consistent point of entry.
|
|
|


Setup:
For the correct setup, visualise three imaginary lines in the sand, as shown in the photos above. Each line has a specific purpose. The line going from the target to the ball and then extending beyond the ball is called the target line. The line that is about 10 degrees open to the target line is the angle of our feet or toes. The perpendicular to the target line originating at the ball represents the ball position, which should be off the left heel for right handed golfers (photo below).

Once you have the correct setup with the same amount of weight on each foot, the face of the club should be slightly open (photo at right). This puts loft on the ball and allows the back portion of the bottom of the club to bounce off the sand, as opposed to having the leading edge dig into the sand.
Technique and entry:
The start of the backswing should be straight back or slightly outside the target line. There is an immediate breaking of the hands as you start this motion, producing a more vertical swing which encourages the club to enter the sand about two inches (4-5cm) behind the ball (this is the point of entry).
What you are actually trying to do is to take as little sand as possible without contacting the ball. Allow the sand to lift the ball from the bunker.
Drills to improve our bunker play.
- Point of entry drill
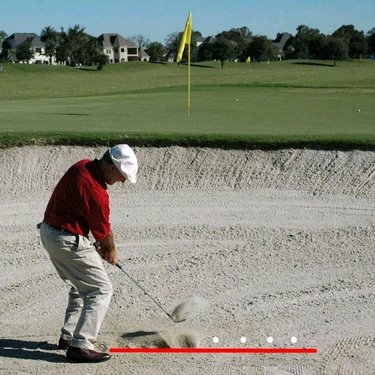
1. First, draw a line in the sand (represented by the red line in the photo).
2. About 5cm in front of that line, play a number of golf balls in the sand.
3. Then assume the correct setup and start making some swings. Remember to accelerate through the ball at impact.
Your objective with this drill is to have the club enter the sand on the line you’ve drawn, which is 5cm behind the “balls.” Practicing this drill can help you achieve consistency on your point of entry with greenside sand shots. This will in turn lead to more consistent bunker shots and improved confidence. Hitler’s will soon be a thing of the past!
One other thing to always remember is to test the sand in the bunker before playing your shot. You are not allowed to ground your club but use your feet to dig into the sand. This should give you a good indication of its consistency which will in turn decide the shot you play. Remember the closer you enter the sand to the golf ball, the more spin you will impart. This may be useful when there is limited green to work with but may also be counter productive if you are looking to land the ball in a safe area on the green and get it to release towards the hole.
Putting
On average most Tour professionals average between 29 and 30 putts a round. If you think about it, that more than twice the number of shots you would hit with any other club during a round. Logic therefore tells us that this is the club we should spend the most time practicing with if we want to improve our scores. Our current tour fines board showing 3 and four putts paints an even dimmer picture for most SOS tour members with the average putts per round probably nudging closer to 40. Only ten shots worse than the pro’s we say, that doesn’t sound that bad. The truth however is far grimmer. Most pro’s hit on average 12 to 13 greens in regulation per round. Even if they did take two putts to get down from there, they would still walk off with a par. Most amateurs would be lucky to hit 6 greens in regulation each round. Technically speaking we should be taking no more putts than the pro’s take as our initial greenside shot would usually comprise a chip or bunker shot which if executed correctly would leave us with a reasonable chance of only putting once.
Despite the above, we are content to limit our putting preparation to a few minutes on the practice green before a round. A solid warm up on the putting green before a round is probably the most important preparation one can go through. Not only does it allow you to practice with a club that will be responsible to a significant portion of the shots you take during a round, it will also give you valuable information on course conditions such as green speed.
Before we look at some basic drills that can be used to improving our putting we need to look at a few other aspects that also play a significant part in our eventual success or misfortunes on the green.
The first would be to develop and adopt a pre shot routine that works for us and stick to this for each and every put we make, irrespective of distance or difficulty. Developing a pre shot routine ensures you are completely focused and committed to the shot, which should in theory lead to greater success. This routine may differ between individuals. There is no right or wrong way to approach a golf shot, it is a personal preference developed over time that works for you. Make mental notes of things that work for you on a regular basis and build a routine around this. I really battle with nerves on short putts for some reason. I think it’s the expectation I put on myself to make it, as in reality it’s not that hard a shot to execute. As such I spend a lot more time over a short put than I do a longer one. The more time I spend over the ball before I hit, the more tense I seem to become. I grip the putter harder and use my hands rather than shoulders. The result is often a drastic pull or push that doesn’t get anywhere near its intended target. As a result of the above I have tried to reduce the time I take to make a put. It is something that has definitely worked as I do not allow my body the time to tense up before I play. More importantly for me, it also reduces the time for negative thoughts to creep into my head.
Part of a pre shot routine should also involve us lining up our put, often from more than one angle. It may sound like overkill but how often do we hit what we think is a good put only for the ball to mysteriously move in the opposite direction to what we thought. By lining up a putt from only one angle we do not get a true reflection of the greens contours and how they will affect the putt. This little bit of extra effort will often go a long way to improving or results on the green. This exercise does not have to slow up play. Whilst others in the group are putting take a look at your put from a numerous angles. By the time your turn arrives you should have all the information you need to make a good putt (CHIP). Another thing we should take note of on the greens is how the putts of our playing partners react around the whole. By watching their putts carefully you will often get information on subtle breaks that you may not have noticed first time around. It will also give you a good indication of the greens speed. All the above information is invaluable in giving us the best chance to make our putt.
The final aspect of putting is one that has been extensively covered in Bernie’s article earlier in the year and revolves around the metal approach and its effect on our performance. It’s amazing how ones confidence can impact the outcome of a golf shot and none more so than putting. There is only one way to get confidence and that is to slowly build it over time. Confidence comes from prior success and there is nothing better than regular practice to build confidence. If you, like me struggle with puts shorter than 2 meters then go off to the range and practice them over and over until you start making them on a regular basis. Seeing the ball going into the hole over and over builds confidence and can be carried through to a round when the pressures of fines for 3 and 4 putts can often get the better of us.
Drills to improve putting:
There are hundreds of drills out there for us to use to help us improve our performance on the greens. Here are a few I’ve tried over the years with some success
- Clock Drill
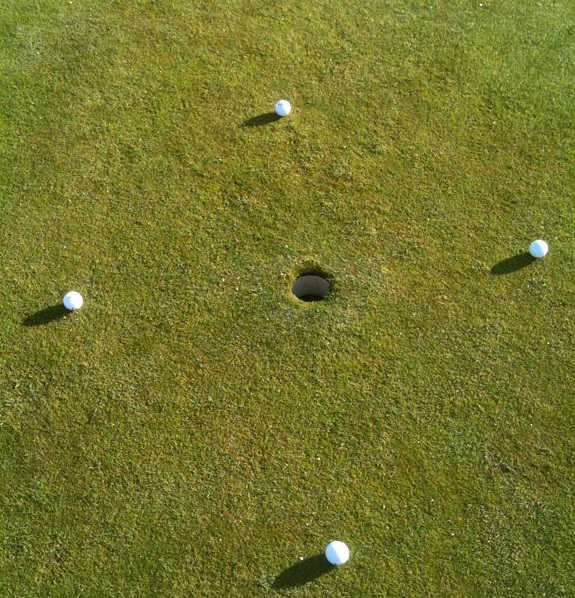
First place 4 tees around the hole at 12 o’clock, 3 o’clock, 6 o’clock and 9 o’clock, 1 meter from the hole on a flat area of the green. Next place a ball next to each tee. The objective is to make 4 consecutive putts. If you miss a putt you have to start again and if you hole all 4 holes you move each tee slightly further from the hole and repeat the exercise. Again if you miss you have to start from 1 meter and if you hole all 4 balls you move onto putting from a slightly further distance.
This is a perfect drill for practicing your pre-shot routine, holing lots of short putts and storing a lot of positive images of successful putts in your mind. Additionally this drill recreates the pressure you will feel out on the course because you can’t afford to lose your focus and start from the very beginning.
You can alter this drill to fit your own personal preferences in a number of ways. Firstly you can decide to hit 3 balls from each tee instead of one. Secondly you can make it harder by setting it up on a slope so as you can practice putting uphill, downhill and with varying amounts of break.
- Distance Control Drill
Stand 8 to 10 meters away from the hole and have 5 golf balls at your disposable. The aim is to putt all 5 balls further than your last putt and short of the hole. Ideally you will putt the first ball 2 meters from the hole and then using your feel and touch, putt the next ball half a meter further than the one before. This drill gives you a real awareness of your distance control.
- Drill to improve putting technique
Confidence can be ruined by poor technique that stems from swinging poorly on your back swing, causing the putter head to come inside or outside too much. To prevent this and shorten your back swing, place a tee directly behind ball with a gap of 15 centimeters. Now when you putt back you are forced into making a short back swing as you touch the tee. This keeps your putter square and encourages you to accelerate through the ball towards the target.
Hopefully some of these thoughts and drills will come in handy when we tackle our next challenge at the Lost City.